Thursday, October 18, 2012

Cedar Breaks & Parowan Gap Petroglyphs

Justin has been pretty busy with his inspection company!  He has recently finished training and started doing inspections with a third company. It isn't any extra days out in the field, it just adds more stops on his trip and makes those trips more profitable. So, instead of doing 10-15 inspections per trip, he's doing 30+ inspections. It also equates to multiple pay checks through out the month (Evil Laugh) which is always great. It is a great supplement to my salary and his hospital pay checks.

On Tuesday, Justin needed to go up to Parowan and Brian Head to do a few inspections and figured we could take Justin's parents to see the Cedar Breaks and the Parowan Petroglyphs (which we've been wanting to see anyway)

Cedar Breaks is always beautiful, especially with snow. It was nice to see it in the fall verses the spring. Less snow!! When you look out over the breaks it's so beautiful because there are so many contrasting scenery to look at. There are the red rocks of the mountains, lava rocks, and even an evergreen forest.


Have to get the picture with everything behind you! 

It was only a 30 min drive from Cedar Breaks to the Parowan Gap, so of course we had to go there. 

This is from the Scenic Southern Utah website and I think they tell the story a lot better than I could. 

You approach the petroglyphs at Parowan Gap along an ancient trail. In prehistoric times the gap was used by peoples living in the Parowan Valley as a convenient passage through the Red Hills. Yearly migrations passed here on their way west to harvest desert resources. Thus from its earliest time the Gap became a seasonal passage that eventually evolved into a calendar itself.
In 1850 the Parley Pratt expedition explored this area for new settlements. When they got to where Parowan is today they made camp for the winter and while exploring the surrounding territory discovered the petroglyphs at Parowan Gap. Recorded in a pioneer journal of this expedition are several recognizable drawings of petroglyphs that can be seen today. The pioneer explorers believed that this was the place that Chief Walder told them was "God's Own House". Even today to walk through the narrows gives the visitor the feeling of reverential awe. The huge pillars on the north and south jut upward into the vast expanse of the sky bringing the blue of the heavens down into the bowels of the earth while the pillars connect the earth to the limitless heavens.
What was the meaning of these inscriptions and why are there so many at this location? Some believe that these glyphs are meaningless doodling. But a little observation tells us that this must be far beyond graffiti. As one Indian told the author, "a person doesn't work for hours and days deeply inscribing figures in solid rock just to doodle." Many glyphs here are deeply incised in the rock face, planned with geometric precision, and inscribed with great skill.
Counts are frequently contained within a glyph by repeated elements. This is probably the most prevalent characteristic of the inscriptions at the Parowan Gap. At other glyphic sites most figures have human or animal forms. However the typical glyph here is a geometric form with some repetitive element incorporated. In some glyphs there is no real figure at all, only the repetition of dots or lines. These indicate number where one mark on the rock represents one of something else: a day, a month, or a year. When these marks are counted they tell of a very observant and insightful people.
Who were these people and why did they create these inscriptions? Archaeological research in the Parowan Valley and surrounding areas has defined a local variant of the Fremont Peoples now called the Parowan Fremont. These people lived in numerous settlement villages up and down Parowan Valley. Their habitations were of many small villages scattered over a fertile valley between the high mountains on the east and the low lying Red Hills on the west. Just to the south and west of the Red Hills was a large marshy area and lake now mostly dry. From the valley land they planted and harvested Indian corn. In the marsh they hunted small animals and water fowl, in the high mountains to the east, they hunted mule deer. And from the desert to the west they harvested pine nuts. Not a bad existence all in all and from this their subsistence was plentiful enough that they found time to contemplate their universe, practice religious ritual and discover the counts that make up celestial cycles. Oh, how they were fascinated with numbers and dates very much like the Meso-American civilizations to the south.

The Gap really is breath taking and awe inspiring! As you walk along both sides of the gap there are hundreds of these carvings in the red rock. It really is beautiful and definatly worth the trip and time out to see them. It kind of is like a "where's waldo" trying to find all of the carvings in the rocks that have faded over time. Some of them you can walk up to see and touch. Most are behind a fence to protect them. 


 These are just 4 pictures, there are hundreds more that we have! 


Today I leave you with a picture of Manny being a cutie!

Tuesday, October 16, 2012

Grand Canyon Trip

Yay! It's finally fall break! School is insane at the moment and I'm grateful to have this week long break away from everything. I have to get my grades done and put a song in to Finale for my beginning band.  Justin and I left Friday afternoon after work to head to Flagstaff, AZ so we could meet up with Justin's family to visit the Grand Canyon. It had been raining for a day before we left and it was continuing to rain as we left, we didn't think anything of it. Then I remembered that we were going to be traveling through the mountains. Once we hit 8000 ft it started to snow. Boo!


Thank goodness it wasn't for long and it wasn't quite cold enough for the road or the ground to freeze so nothing stuck to the road. 

We pulled into Flagstaff around 8pm and spent the night in a hotel and caught up with Justin's family. We had a late late dinner at Denny's (because I was craving pancakes.... Bad!) 

We got to the park around lunch time and had a picnic before we walked through the park. We entered through the south rim and grabbed a whole bunch of pictures at the first look. 


 Thanks Justin for the amazing picture.


 It was pretty bright.. hence the amazing picture of us.
 After we took all of our pictures at the first look we took the shuttle on the western side of the canyon. The guide said that this was the side where the California condors nest and it was the best place to see it. 


 There were still left over from the orphan mine. It was a uranium mine and if I remember correctly, the project only lasted a few years but took 13 years to clean it up.


We stayed for half a day then Justin and I drove back up North to Page, AZ to spend the night. We wanted to try to go half way home.


 Love it!

I have a lot of favorite things about living in the desert and I've mentioned a few of them. Another one of my favorites are the sun rises and sets. 


This is on the way over the mountains into Page. I love the reds, oranges, and purples. 


We also had a very pretty sunrise in Page. The picture doesn't do it justice. It was the same orange, red, and purples we saw the night before.

And yes there was still snow on the way home -_-


 We were ready to go home. Justin wanted to do a duck face picture. Ta-Da!


There it is... a few pictures from our quick weekend trip! 


Thursday, October 4, 2012

My super fun music class!!

At the conclusion of our instrument family term I talked about sound waves. We've been talking about vibrations and what vibrates on the instrument/person to create the sound and the sound waves. So I found a couple of "experiments" on pinterest to try....... and..... they epically failed!! So I quickly changed the experiments around and used it to talk about different things. I grabbed some pictures so everyone could see how much fun we have in music!

I started with the oobleck (cornstarch and water), food coloring, and sub woofer tests. The oobleck was suppose to dance up and you should of been able to see all the waves. The original pin is here. It very well could have been that I was using a speaker and not an actual sub woofer but oh well!

So this was the set up. I sat against the wall and had the kids sit in front of my. I used a plastic drop cloth to protect myself from the janitor  keep the carpet mostly clean!


So I set up my extra supplies to my left. Corn starch, water, food colorings, etc. I also kept the second experiment, which is the wine glass and glow sticks.

The speaker stayed on my left so I could easily move it out onto the plastic. As you can tell it's been well used and I have to clean it well tomorrow!

 Set out the plastic drop cloth with the kids around it.

My mixer was to my right so I could change the volume when it got too loud. I have some dramatic kids!

And I set up my computer hooked to the mixer. I would have used my phone, but I couldn't get the tests to open. Oh well! 
That may or may not be my guitar in the background on the floor. I need to reset it up again. Too many videos of people playing instruments. 


Gotta keep a roll near by! I kept a wet cloth too so I could wipe my hands. 

I poured the cornstarch into a small bowl. I used 1 cup of corn starch. Then I added 1/2 cup of water. It worked best on a 2:1 ratio cornstarch to water. I stirred it was well as I could with a spoon, but mostly I used my hand. 

Yay Oobleck! 

We spent about 10 minutes talking about the properties of oobleck. (That it's a solid when it is being touched or pressure is placed on it, and a liquid when left alone) I asked the kids if there was anything that they wanted tested. I didn't let the kids touch it because it was very messy and they did not have smocks on. They wanted to see what would happen if I rolled it into a ball, or punched it, or made it into a snake, etc. One student asked what would happen if I put some on my face. I did :) For the classes I knew I could trust, I let them punch the oobleck. I knew their fists wouldn't go through and they wouldn't get messy. They were so amazed that they could do that! 

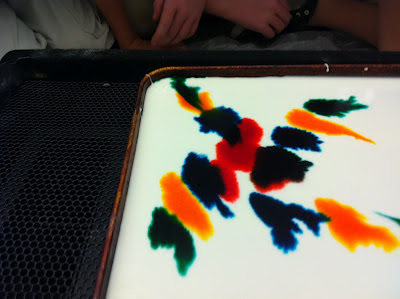
I placed some food color drops in a pattern for them.

And then placed it on the speaker. We played different hertz to see what the reaction would be. I used this website for the subwoofer tests. I used 20, 40, 50, 63, 100, 125, 400, 800, 10,000, and 20,000 hz.
They started to mix. We found that the best to see waves and bubbles was the 100 and 125 hertz, although we found that bubbles appear in all the hertz up to 125. When we went up to 400 if was vibrating too fast for the tray or speaker to move. 

Yay Bubbles!

The bubbles and waves would stay after the speaker was turned off. 

I thought I got a video but.... the one I got was bad! Boooooo! 
 

After we talked about the oobleck we moved onto the water glass and glow sticks. The pin said that you were suppose to see an aura above the glass and then I read the comments and the woman said that it was only seen through a picture on a camera... Awesome... -_- 
Here is the original pin. 

So I changed it to running my finger around the edge and using the glow stick as a way to light up the water so the kids could see the surface vibrating. We used the time to talk about what is actually vibrating (water or the glass), how different water levels made different pitches, how the water was easier to see vibrating when it was close to the edge. I filled up the glass from empty to very full! It allowed the kids time to be really quiet so they could hear the low pitches of the very full glass. 

I used two of the bracelet glow sticks because they fit perfectly in the glass. I ran my finger around. I had a good student put some water in my measuring cup so I could fill and empty as I please. Thank Goodness for a sink in my classroom!


As you can see... I was a mess!! But the kids really enjoyed it. They loved sitting in the dark looking at the waves. 

Over all, it was a great two days! I repeated the lesson 10 times so each class got a chance to see it. Some of my horrible classes were even well behaved! So over all it was a good end to the week! 

If you have any questions on what I did, feel free to ask! 


Sunday, August 19, 2012

Carrot Cake Muffine Recipe! I am in heaven!

I am horrible about breakfast when I'm working. I never plan enough time in the morning to make breakfast or even eat breakfast at home. (And most of the time my stomach doesn't let me eat that early.) All last year I lived off of Toaster Strudels, the breakfast-y kind not the jelly filled kind, and instant breakfasts. That all changed when I found a recipe for carrot cake muffins. I hate carrot cake... with a passion! I just happened to marry someone who is in love in carrot cake and has since stopped eating it because he knows I hate it. So I compromised and made these muffins for him. Then I ate one. Oh My Goodness!! These are amazing!! There's cream cheese inside the muffins! Needless to say, I eat these for breakfast so I'm not tempted to stop at Carl's Jr or Maverick for breakfast. I add in a no sugar added instant breakfast to drink to give my breakfast more protein so I stay fuller long. I don't have a lunch break this year, just random 20-30 minute breaks in between generals. If I have to prepare my classroom for the younger kids I'm left with 10 minutes trying to shove a salad down my throat before the kids come. Awesome -_-

Anyway here is the recipe for the carrot cake muffins. I found the recipe from pinterest here. It is a King Arthur flour recipe and pretty much the most amazing thing I have ever tasted.

One 8oz package cream cheese
2 1/4 cups (9 1/2 ounces) AP flour
3/4 cup granulated sugar, divided.
¼ cup light brown sugar, firmly packed
1 1/2 teaspoons baking powder
¼ teaspoon baking soda
1 1/2 teaspoons ground cinnamon
3/4 teaspoon ground ginger
3/4 teaspoon salt
2 large eggs
3/4 cup water
1/3 cup vegetable oil
1 cup grated carrots (2 med-large carrots) I usually add more.  


1) Preheat oven to 400 F

2) Lightly grease or use paper liners in a 12 well muffin pan (I used 2 6-well silicone muffin pan and sprayed with non-stick cooking spray)

3) Unwrap the cream cheese and add 1/4 cup white sugar to a microwave safe bowl or a small pot.
4) If you are cool, unlike me, microwave the cream cheese and sugar for 40 seconds. I don't own a microwave nor did the house come with one and even if we had one it wouldn't fit in my kitchen. I did it the pain-staking process of melting it over the stove. Awesome...
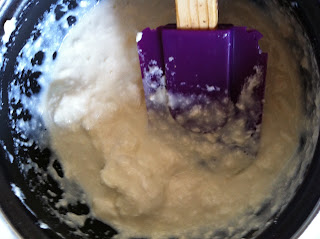
Stir the cream cheese until smooth

5) In a large bowl, whisk together all the dry ingredients. No Carrots yet!
Hang on, let me check my cream cheese


Some days I wish I had a microwave!

6) In a separate small bowl mix together the wet ingredients. No Carrots Yet!

Let's check on my cream cheese again...
We're getting there!

7) Grate your carrots. Since there aren't children in the house to hide veggies in food, I just did the largest hole on my box grater. Get as tiny as you need to hide them in the muffins. Run it through the food processor if needed!

*We usually buy carrots from Costco because we can get it in the 5 lb bag and we use it for piggy food. I grabbed a small bag from Wally World last night and I was super surprised at the size difference* 
O_o

 *If you have a dog... throw over the end of the carrot to them and let them play with it* 


Hang on, I have the check my cheese again
10 minutes... and this is as far as I've gotten. -_-

8) Since these are muffins, we are going to use the muffin method (huh... who would have guessed :D)  The muffin method is where we keep the wet and the dry separated until we are ready to mix. The next step is to combine the wet into the dry ingredients. Mix only for 10 seconds. I like to fold in the wet ingredients into the dry.

PS. This is how you fold if you need to know! Psst.. Right here!

9) Resist the urge to combine all the wet into the dry! Don't do it!! It will make tough muffins!
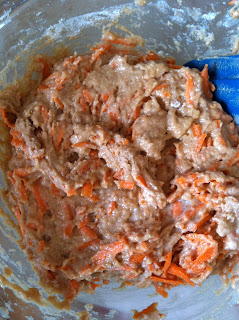
 10)  Fold in the grated carrots


 Ok one last check on the cheese, what ever it's at is what it's going to be. 
 I give up.. it isn't going to be smooth.. Slightly bumpy cream cheese! 

11) Next starts the layering process. I like to use the small ice cream looking cookie scoops for this. I think they are a tablespoon each??  Maybe?? 

Can you see me in the reflection?? 

12) Put two tablespoons or two scoops in the bottom of each well. I spread it out with my fingers or the back of the scoop. My batter is really thick so it was pretty easy. 


13) Place 1 tablespoon or 1 scoop of the filling on top of the bottom batter layer. Try to aim for the middle. I had some extra left over so I just divided it amongst all of the wells.

14) Place 1 tablespoon on the leftover batter on top of the filling. Again, I had leftovers so I divided it amount the wells. I smoothed out the tops again so the filling was sealed. The left has been smoothed and the right is just the batter placed on top.


15) Bake for 20 minutes.
Yumminess!!!

16) Let the muffins cool for a few minutes and then remove from the tin and cool on a cooling rack.
Once the muffins cool completely the muffins need to be refrigerated because of the cream cheese in the middle. These are great cold too.. but I like to heat them up in the microwave (at school) or use my toaster oven.

Delicious!!!

Justin also bought me a late birthday present... He got me my own chef jacket. I have been using his and well... it's nice to have one that fits me. I know.. I know.. it's morning.. and It doesn't look like me.


  These are the same person?? O_o

Anyway... Enjoy the muffins! I really like them because I get dairy, protein, veggies, and some carbs in the morning. I'm sure you can easily substitute applesauce for the oil and half of the AP flour for WW flour to make them more healthy.

Today I leave you with Baby! She's such a cutie!